

TL;DR:
- Inconsistent listing photos can harm a brokerage’s brand and slow down deal flow without proper standards. Implementing MLS compliance, standardized editing, and dedicated partnerships ensures quality, efficiency, and brand consistency across all listings. A deliberate, data-driven process with clear standards and reliable vendors boosts productivity, buyer engagement, and overall team professionalism.
Inconsistent listing photos are one of the most overlooked problems in real estate brokerage operations. One agent submits crisp, MLS-compliant images. Another uploads dark, poorly cropped shots that get rejected or buried. When you multiply that inconsistency across a team of 10, 20, or 50 agents, the damage to your brokerage’s brand compounds fast. Getting photography for real estate brokerage team operations right is not just about making listings look nice. It’s about creating a repeatable, compliant, high-volume system that every agent on your roster can follow without slowing down their deal flow.
Table of Contents
- Key takeaways
- Photography for real estate brokerage teams: MLS compliance essentials
- Shooting and editing standards for consistent results
- Streamlining scheduling, billing, and delivery through partnerships
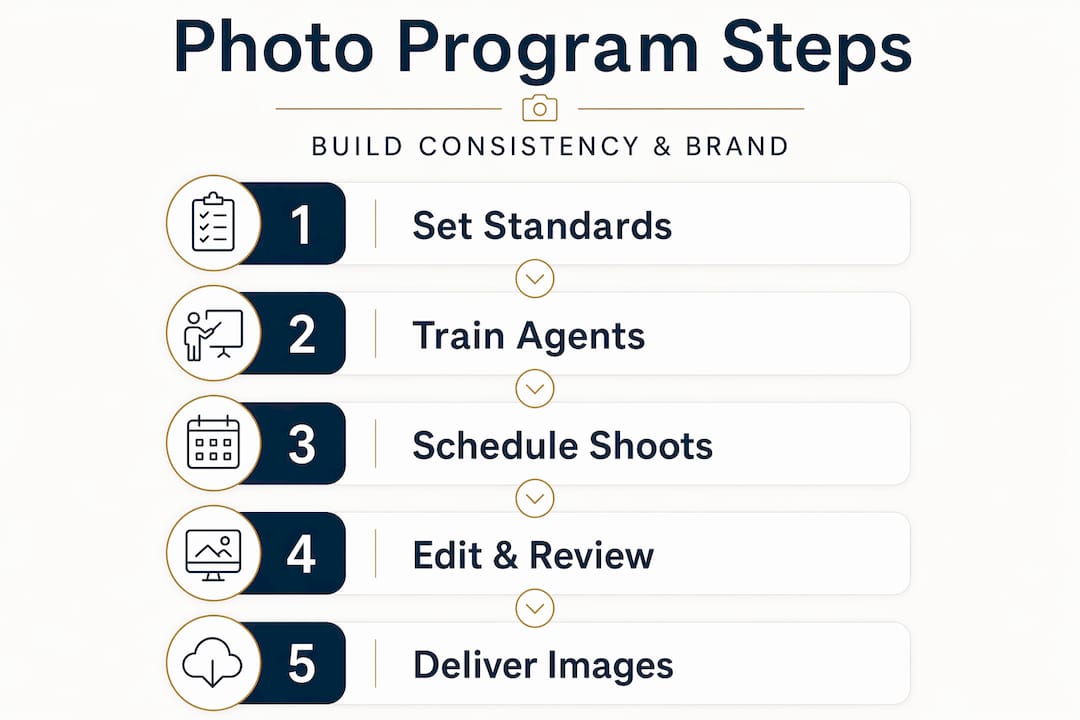
- Six steps to build your brokerage photography program
- Common mistakes that delay listings and hurt your brand
- My honest take on photography as a brokerage strategy
- How Eric Campbell Photography supports your brokerage team
- FAQ
Key takeaways
| Point | Details |
|---|---|
| MLS compliance is non-negotiable | Photos must meet resolution, orientation, and color space standards to avoid listing rejections and delays. |
| Consistency builds brand equity | Standardized editing and shooting guidelines create visual cohesion that buyers recognize across all your listings. |
| Partnerships reduce operational load | Brokerage partnership programs with dedicated scheduling and billing tools handle volume efficiently. |
| Agent education prevents mistakes | Training agents on compliance rules and photo submission standards cuts rejection rates significantly. |
| A six-step program drives results | A structured implementation roadmap takes your team from ad hoc photo decisions to a repeatable, professional system. |
Photography for real estate brokerage teams: MLS compliance essentials
Before your team can focus on making listings look great, every agent needs to understand the technical floor. MLS boards are specific, and photos that miss the mark get rejected without warning.
The core technical requirements most MLS boards enforce include:
- Resolution: Minimum 1024 pixels wide, with a recommended size of 2048×1536 pixels for the sharpest display across devices.
- Orientation: Landscape only. Portrait photos are a common rejection trigger and one of the easiest mistakes to prevent.
- Color space: sRGB is the standard. Images exported in Adobe RGB or ProPhoto RGB often appear dull or discolored on MLS platforms.
- File size: Most boards cap uploads at 10MB per photo. Verify your local board’s limit before building your export workflow.
- No overlays: Watermarks, logos, agent contact info, and text overlays are prohibited on MLS photos. This catches newer agents off guard regularly.
- First photo rule: The front exterior must always be the lead photo. Boards enforce this because buyers expect a consistent browsing experience.
- Virtual staging: Digitally staged images are permitted in most markets, but must be disclosed clearly in the listing remarks and photo captions. Some boards also require a dedicated checkbox during submission. Always verify your local rules.
The brokerage-wide implication here is that these rules apply to every submission, not just the ones your top producers handle. One agent’s compliance failure can delay a listing, disrupt a client relationship, and reflect poorly on your entire office.
Pro Tip: Batch validation tools with MLS-compliant export presets automate dimension, color space, and file size checks before submission. Build one into your team’s photo delivery workflow and watch rejection rates drop immediately.
Shooting and editing standards for consistent results
Technical compliance gets you in the door. Quality editing is what makes buyers stop scrolling. The gap between a mediocre listing photo and a strong one almost always comes down to post-processing rather than camera equipment.

Effective real estate photo editing follows a predictable workflow. Exposure balancing, color correction, perspective correction, and HDR blending are the four pillars. Each one addresses a specific visual problem: blown-out windows, warm or cool color casts, converging vertical lines, and the contrast challenge that comes from shooting interiors with bright windows in frame.
For exterior shots, realistic cleanup is the standard. Sky replacements, lawn greening, and removing a stray garbage can from the driveway are all widely accepted enhancements. Digitally adding a pool or removing a power line that genuinely affects the view crosses into misleading territory. The line is: correct what a good shoot day and a skilled photographer would have captured naturally.
Here is what your brokerage editing standards document should cover:
- White balance target for interiors (typically 5500K to 6000K for a neutral, natural look)
- Vertical and horizontal perspective correction for every shot
- Exposure targets for windows and walls in the same frame
- Exterior sky and lawn enhancement guidelines and limits
- A defined color grade or preset that applies to all listings for visual consistency
That last point matters more than most brokers realize. Consistent image style across listings builds brand recognition and improves buyer engagement. When buyers see your name attached to a listing, the visual quality should be predictable. That predictability is trust.
Pro Tip: If your team handles high listing volume, outsourcing editing to a dedicated real estate photo editing service often costs less than the time your agents or coordinators spend doing it in-house. The turnaround is usually faster too.
Streamlining scheduling, billing, and delivery through partnerships
Managing property listing photography across a large team without a system in place is a recurring headache. Agents book different photographers, use different editing workflows, and submit photos with wildly different quality levels. The fix is a brokerage partnership program designed for volume.
Brokerage partnership programs built specifically for real estate teams typically include dedicated scheduling portals, custom billing structures, and exclusive pricing packages. Instead of each agent managing their own bookings, the brokerage has a centralized portal where sessions can be scheduled, tracked, and coordinated across the full team.
The financial structure matters too. High-volume brokerages benefit from customized billing arrangements that allow bulk booking and consolidated invoicing. Rather than 30 agents submitting 30 separate expense reports, the brokerage receives a single monthly statement tied to actual shoot volume.
Here is what to evaluate when selecting a photography service partner:
- Dedicated scheduling access: Does the vendor offer a portal built for team use, or are you still booking one shoot at a time through a general consumer calendar?
- Turnaround time guarantees: For active listing markets, a 24 to 48 hour photo delivery window is the operational standard. Verify this before committing.
- Editing consistency: Ask to see photo sets from multiple different properties. Inconsistent editing across listings signals a production workflow that won’t scale for your team.
- MLS compliance knowledge: Your vendor should understand local MLS requirements without you having to explain them. This is a basic qualification, not a bonus feature.
- Billing flexibility: Can the vendor accommodate per-listing billing, monthly volume packages, or broker-pays vs. agent-pays structures depending on your office model?
| Feature | Individual agent booking | Brokerage partnership program |
|---|---|---|
| Scheduling | Agent manages individually | Centralized portal for whole team |
| Billing | Per agent, multiple invoices | Consolidated monthly billing |
| Pricing | Standard retail rates | Volume-based exclusive pricing |
| Consistency | Varies by agent preference | Standardized across all listings |
| Turnaround | Depends on vendor availability | Guaranteed delivery windows |
Six steps to build your brokerage photography program
A strong photography program does not happen by accident. It gets built deliberately, one step at a time. Here is a practical roadmap you can start implementing this week.
Define your standards. Write a one-page photo standards document. Include required resolution, color space, orientation, editing style, and first-photo rules. This becomes the reference point for every agent and every vendor you work with.
Select your vendors. Identify one or two photography partners who understand MLS compliance, offer consistent editing, and can handle your listing volume. Single-vendor relationships simplify billing and standardize quality faster than a rotating roster of photographers.
Set up scheduling and volume tracking. Whether you use your vendor’s portal or a shared team calendar, every agent should book through the same system. Track shoot volume by agent monthly so you can identify who is underutilizing the program or running into repeated issues.
Educate your agents. Run a 30-minute onboarding session covering photo compliance rules, how to prep a property for a shoot (clear counters, open blinds, remove personal items), and how to submit photos correctly to your local MLS. Refresh this training whenever your MLS updates its requirements.
Monitor quality and delivery times. Assign someone at the brokerage level to spot-check photo sets before they go live. Look for compliance issues, inconsistent editing, and anything that does not match your visual standards. Track delivery times and flag vendors who miss their windows.
Refine based on data and feedback. After 90 days, review your rejection rates, agent feedback, and listing engagement metrics. Use that data to adjust your standards, switch vendors if needed, and update your training materials.
Pro Tip: Pair your listing photo program with a consistent agent headshot standard. When your team page and your listing photos share the same visual quality level, your brokerage brand feels coherent to buyers and sellers. Eric Campbell Photography’s team headshot booking guide walks through exactly how to coordinate this for offices of any size.
Common mistakes that delay listings and hurt your brand
Even well-run brokerages run into recurring photo problems. Knowing the most common ones ahead of time lets you build prevention into your process rather than fixing issues after the fact.
The most frequent MLS photo rejections come from a predictable short list. Orientation errors, watermarks, identifiable people in frame, incorrect first photo, and undisclosed virtual staging account for the vast majority of compliance failures. Most of these are avoidable with a simple pre-submission checklist your agents complete before uploading.
Inconsistent visual style is a subtler problem but a more damaging one over time. When your brokerage has listings ranging from warm, professionally edited photos to dark, phone-shot images, buyers form an inconsistent impression of your brand. There is no single listing that makes or breaks you. It’s the pattern across dozens of listings that defines how your office is perceived in the market.
Virtual staging deserves its own warning. The technology has improved dramatically, and digitally furnished rooms can genuinely help buyers visualize a vacant property. But disclosing it correctly is not optional. Failure to disclose virtually staged photos can create legal exposure for the listing agent and the brokerage.
Communication between agents, photographers, and editors is where most operational breakdowns happen. Agents assume the photographer knows the property was a short-notice listing and will be there at dawn. Photographers assume the property is staged and ready. Editors assume the shoot went smoothly. Build a simple handoff checklist that travels with every shoot from booking to delivery.
“The listings that get the most attention are not always the most expensive properties. They’re the ones where the photos make you feel something the moment the page loads.”
That feeling is not accidental. It comes from preparation, technical skill, and a consistent standard applied every time.
My honest take on photography as a brokerage strategy
I’ve worked with real estate professionals at every level, from solo agents building their first brand to large teams managing dozens of active listings at once. What I’ve seen consistently is that photography is treated as a transaction cost rather than a marketing investment. Get the photos done, upload them, move on. That mindset costs brokerages more than they realize.
The truth is that your listing photos are often the first and only impression a buyer forms of a property before deciding whether to tour it. In my experience, teams that invest in professional photos for marketing see faster inquiry rates, better-prepared buyers at showings, and fewer price objections from sellers who understand their property is being presented at its best.
There’s also a productivity angle that gets overlooked. When agents do not have to manage their own photography logistics, they spend that time on client relationships and new business. A well-run brokerage photography program is not just a quality upgrade. It’s a time savings for every agent on the team.
The brokers I’ve seen get this right share one trait: they treat photography standards the same way they treat any other compliance requirement. It is not optional, it is not left to individual preference, and it is reviewed regularly. The brokers who struggle treat it as a nice-to-have and wonder why their brand feels inconsistent.
If you are a team leader reading this, the simplest version of the advice is this: set the standard, pick the partner, and make the process easy enough that every agent follows it without thinking twice.
— Mike
How Eric Campbell Photography supports your brokerage team
At Eric Campbell Photography, we work with real estate teams across South Florida who need more than a one-off shoot. Brokerage teams have specific needs: consistent quality across every listing, fast turnaround that keeps deals moving, and a partner who understands local MLS requirements without needing a briefing. Our real estate headshot services extend to full team photography programs, including mobile sessions that come to your office so agents can refresh their professional images without losing half a day. Whether you need a consistent agent headshot program alongside your listing photography, or you are ready to talk about a partnership structure built around your volume, we are ready to make it easy. Visit ericcampbellphotography.com or call 954.766.1954 to start the conversation.
FAQ
What are the basic MLS photo requirements for listings?
Most MLS boards require landscape orientation, a minimum resolution of 1024 pixels wide (recommended 2048×1536), sRGB color space, no watermarks or logos, and the front exterior as the first photo in the set.
How do brokerage partnership programs improve team photo workflows?
Partnership programs offer centralized scheduling portals, consolidated monthly billing, and volume-based pricing that replace the fragmented, agent-by-agent booking process most teams default to.
Does virtual staging require disclosure on MLS listings?
Yes. Virtually staged photos must be disclosed in listing remarks and photo captions, and some MLS boards require a dedicated checkbox during submission. Always verify your local board’s specific rules.
How many photos should a listing include for best results?
Most MLS boards allow 25 to 50 photos. A well-produced set of 20 to 35 images covering all key rooms, the exterior, and any standout features typically performs better than a padded gallery with redundant shots.
How can real estate agent headshots support a brokerage’s visual brand?
Consistent, professionally shot agent headshots paired with high-quality listing photos create a unified visual identity for your brokerage. The agent headshot guide from Eric Campbell Photography outlines how to align team portraits with your broader marketing standards.
Recommended
- Real Estate Agent Headshots: Ultimate Guide for 2024 – Headshots & Family Portraits by Eric Campbell Photography
- Real Estate Headshots by Eric Campbell Photography: Elevate Your First Impression | Award-Winning Portraits
- Use Professional Photos for Marketing That Converts
- How To Book Office Headshots For Your Whole Team Fast